gluten-free Festive Cake
gluten-free Festive Cake
16-18
kpl20
minutesYou'll need a loose-bottomed cake tin about 25cm wide, line the bottom with baking paper, and trim off the excess around the edges.
Ingredients
- Brownie base
2 dl Virtasalmen Viljatuote's gluten-free all-purpose flour mix
0,5 dl unsweetened cocoa powder
1tspsalt
1 tsp baking powder
120 g butter
220 g sugar (regular or optional)
2 large room temperature egg
2 tsp vanilla essence/powder
- Dark chocolate mousse
250 g (dark) chocolate
4 dl whipping cream
a pinch of salt
2 tsp gelatine powder
2 tsp water
- Raspberry mousse
400 g frozen puff pastry
250 g white chocolate
4 dl whipping cream
a pinch of salt
2 tsp gelatine powder
2 tsp water
Pink food colouring. (not mandatory!)
- White chocolate mousse
250 g white chocolate
4 dl whipping cream
4 tsp honey
a pinch of salt
2 tsp gelatine powder
2 tsp water
2 tsp vanilla essence (alternatively real vanilla or vanilla sugar)
Prepare a quick chocolate ganache like this:
2 dl whipping cream
300 g chocolate (dark, milk or white according to your taste.)
Preparation
- Brownie base
- Preheat the oven to 175 degrees.
- Line a cake tin well with baking paper or butter and breadcrumbs.
- Mix together the flour, cocoa, salt and baking powder. Set aside to wait.
- Cube the butter and put it in a saucepan, melt it over a low heat.
- Stir occasionally until the butter is completely melted.
- Add the sugar to the butter, and stir until the sugar is completely melted into the butter.
- Do not allow the butter-sugar mixture to boil at any stage.
- When the mixture is completely melted, allow it to cool to room temperature.
- When it has cooled, whisk in the eggs, one at a time.
- The mixture starts out crumbly, but smooths out and becomes shiny as you whisk.
- Whisk in the vanilla as well.
- Finally, add the dry ingredients.
- Stir gently with a spatula.
- Pour the dough into a cake tin, and bake at 175°C for about 20-25 minutes.
- The bottom is deliberately left a little sticky.
- Let the base cool down properly before you start making the mousses.
- You can make this base the day before, wrap well, and continue the next day by making the mousses.
- Mousset
- First, place the finished brownie base upside down on the bottom of the removable cake stand. (This is to make the cutting surface neater.)
- To get a neat edge, I recommend putting a border film around the edges. Baking paper is also fine, but it's easier to handle. The edge of the cake should be at least 10cm high, as this is going to be a big one!
- Place the cake pan directly on top of the serving dish, or on a cardboard cake stand, as you shouldn't move the cooling cake too much.
- For the chocolate mousse, chop the chocolate into small pieces and place in a microwave-safe container.
- Pour over 1dl of cream and a pinch of salt.
- Microwave for 30 seconds at a time, stirring occasionally until the mixture is completely melted.
- Pour the melted chocolate mass into a larger bowl, and allow to cool to room temperature.
- When the chocolate cools, mix two teaspoons of gelatine powder with two teaspoons of cold water.
- When the gelatine has set, microwave it for 15-20 seconds and stir it into the chocolate.
- At this point, the chocolate should still be warm, so that the gelatine mixes in and does not remain lumpy.
- Whip the remaining 3dl of whipping cream into a stiff froth.
- When the chocolate is cool enough to handle, gently mix the cream and chocolate together.
- Pour the mixture over the brownie base, and place in the fridge to set.
- Leave to chill for at least 20minutes before adding the second layer.
- So at this point it's a good idea to wash all the utensils, and start again to make the second mousse.
- For raspberry mousse, cook frozen raspberries for about five minutes.
- Puree, and press through a small sieve, as raspberry seeds are nasty on the teeth.
- Chop the white chocolate in a microwave-safe container and pour over the raspberry puree, a pinch of salt and 1dl of whipped cream.
- The last one! White chocolate and vanilla mousse, again the same thing.
- White chocolates, 1dl cream, honey and a pinch of salt in a microwave-safe container, etc.
- Vanilla essence is added at the very end.
- Leave to set in the fridge for at least 4 hours, overnight would be best.
- Next, carefully remove the pan and the foil from around the cake.
- Chocolate ganache
- Bring the cream to a boil, and add the finely chopped chocolate.
- Stir constantly until the chocolate has melted into the mixture.
- Allow to cool slightly, then carefully pour over the cake.
- If the chocolate is too hot, it will go through the mousse, so just let it cool down.
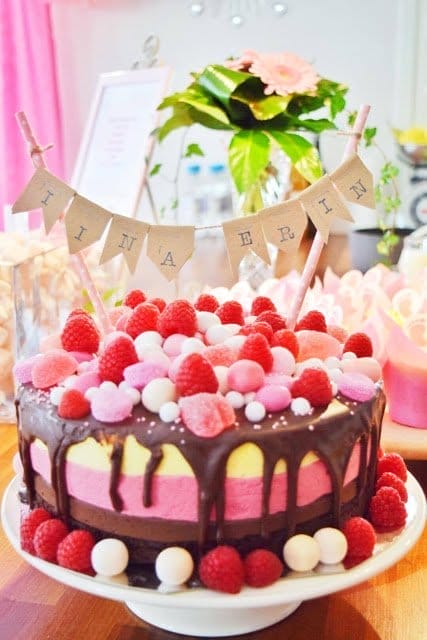
- It doesn't matter if the main topping doesn't turn out perfect, because the cake will still be lined with your favourite candies/berry!
- Let the chocolate run down the edges in a carefree way and you're guaranteed a beautiful finish.
- The cake will keep well for at least a week, but I don't think so, because it's heavenly good!
© Ida Kiviluoto
http://mutsijamurupullat.blogspot.fi

 Gatumat för Vardag och Fest recepthäfte (SWE)
  Spoothie Gluten Free Wild Berry Snack, 16 pieces per batch
  Gluten Free Whole Grain Brown Rice Flour, 3 kg
  Gluten Free Buckwheat Bran, 250 g
  Gluten Free Finnish Buckwheat Flour, 3 kg
  Gluten Free Oat Flakes, 800 g